m (ACTUAL Link!) Tag: Visual edit |
m (Another link.) Tag: Visual edit |
||
| Line 1: | Line 1: | ||
| − | <pre>YOU MUST HAVE [[Silver VIP]] OR BETTER TO USE THE MAP EDITOR!!!</pre> |
+ | <pre>YOU MUST HAVE [[VIP Status|Silver VIP]] OR BETTER TO USE THE MAP EDITOR!!!</pre> |
== '''Editor Basics & Navigating to the Editor''' == |
== '''Editor Basics & Navigating to the Editor''' == |
||
Revision as of 13:23, 4 July 2020
YOU MUST HAVE [[VIP Status|Silver VIP]] OR BETTER TO USE THE MAP EDITOR!!!
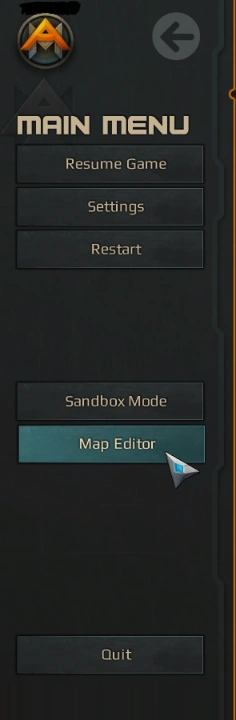
VIP players can start a solo match on the map you wish to edit and press Esc to find the Map Editor and Sandbox buttons.
Click and drag with the middle mouse wheel to navigate around the map. Scrolling up or down with the mouse wheel will zoom the camera in or out. Click and drag to move objects on the map, and use Ctrl to select multiple objects.

The top-left buttons will change your cursor's behavior from normal click/drag to rotating, resizing, or box select.
There are two different units that we'll be referencing today: Terrain units and Object units. The easiest way to remember this is that one Terrain unit is 8 Object units.
Creating your Map
Map Metadata

It is important when mapmaking to fill out your map's metadata (either just meta, info, or data, from here on out) either when or before you are creating your map. Meta includes things like your Map Name, map boundaries, and Kill Planes.
Map Bounds
In this section, you can adjust where the player and their camera are allowed to be. "CameraExt" is how far the camera can go. "MapExt" is how far the minimap will go. Force Box is a set of coordinates, as well as Power and Rotation, that set where Mechs and units are allowed. If you want to disable the Force Box, set the second-to-last number to 0. If you want it enabled, then set it to any number that is 1 or higher. All of these coordinates are managed in terrain tiles, not units.
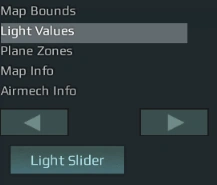
Light Values
In this section, you have the ability to adjust the lighting in your map. It is suggested that you use the Light Slider tool, as shown in an image to the right, which can be accessed using a button on the top o the interface. You can alternatively enter the data directly into the boxes below the Light Slider button. It is recommended that you only do this if you are looking for precise colors or values.
Plane Zones
Under Plane Zones, you can find just two values: TransformPlane and KillPlane. These are the levels, in object units, that will deal damage and cause your Mech to transform into their aerial counterpart, respectively. The default values should be fine for most maps.
Map Info
This one is important. Here, you can give your map a name (spaces allowed!) in the MapName box, cannot choose a skybox likely because of a bug, can (and really should) set the PregameTime, which is the countdown before the match begins, and how long you have to select your loadouts before the game starts. PregameRadius is pre-set and should be OK for most maps. GameStyle is the different styles of game, most of these are from Wastelands. These game moderate broken in AirMech's current state. The only game style that works is Versus.
Adding Objects

New objects can be placed by clicking the + button at the top-right of the editor. Use the drop-down box to filter by category. You can place objects on the map by clicking and dragging them from the editor panel to the terrain. Use the drop-down box at the bottom to assign team control.
Objects on the map can be selected with the mouse cursor after clicking the wrench icon at the top-right. Hold Ctrl to select multiple props. Click and drag to move props around the map. You can quickly duplicate an object by holding Shift while dragging. Press E to make the mouse cursor rotate objects. Press R to have it change the render scale. Press W to go back to moving objects. Holding Alt will allow you to move the object vertically. Press M to plant an object to the terrain or object below.
Useful Objects
- Auxiliary Power Sockets are the prop "FortPadBase"
- Socket-Related things, like wires, can be located by searching "pad"
- Outposts can be found under Prefabs. Modern Outposts, with units on top, have a "v2" at the end
- The only Game Location is the "Circle," which is used for setting positions for the pre-game camera.
Terrain Editing

At the top-right corner, click the terrain editing button that looks like a slope, then click on a terrain tile to begin editing. you can change the tileset of the tile with the drop-down box near the top-right. The icons near the top will change the mesh set (0 through 9 are hotkeys for these). The double arrows will cycle through available variants of that mesh set, or use the dice button to randomize. Below that, the curved arrows will rotate the tile by 90 degrees. The vertical arrows will raise or lower the tile's elevation. The textbox beside these arrows will determine how many units (measurement of distance) to raise/lower the terrain each time. For fine manipulation of terrain tiles, you can also use the arrow keys to transform the positioning of terrain tiles by one unit at a time in the X and Y axes. You can, of course, hold Control to transform by 4 units at a time.
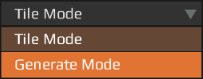
For mas terrain manipulation, you may also want to visit the Generate section of the Terrain Editor. There, you can find useful tools for creating and destroying terrain tiles and even objects. When generating, you can select a biome from Tile Mode, and then generate to your heart's content. Gen = Generate. Nuke = Destroy. Vis = Visible.

NavMesh is a layer above the terrain that serves as a geometry map for units to calculate paths. You can see a visualization of the NavMesh by pressing F4 once or clicking the left NavMesh button at the top. Press again to see infantry specific pathing. Pressing once more will toggle it off. NavMesh is generated by clicking the right NavMesh button at the top of the editor view (may take a few seconds to finish). This must be done any time terrain or props are changed.
Sample Map

The Sample Map is like the NavMesh but is instead for AirMechs. It needs to be updated whenever changes are made to the terrain or tall props. Click on the Sample Map button at the top-right corner to view the Sample Map grid. Map coverage, rotation, spacing, and height can be adjusted here, but it's usually best to use the values already set for each map. The Generate button will create a new Sample Map.
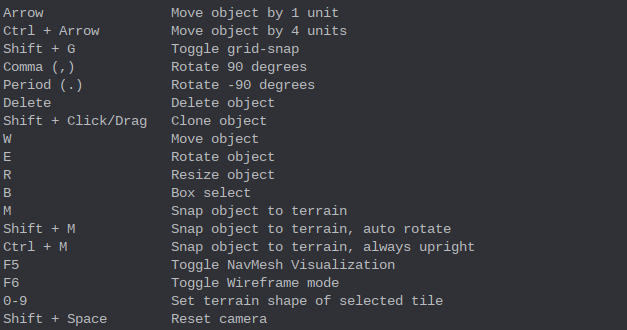
Editor Keybinds